5 Steps to the Perfect Hip Thrust
We won’t deny that the hip thrust exercise can look quite uncomfortable, what with that loaded barbell teetering on your lap as you lie sideways, your back arched awkwardly atop a flat bench. Heck, it can be bewildering to even figure out how to get into the starting position, much less maintain the balance of the weight or perform a rep with ideal form.
While we likely can’t make your first time doing the hip thrust a perfectly graceful experience, what we can promise is that, with a little practice, you’ll be doing it right in no time. And that’s a good thing, considering the move is arguably the best glute-growing movement in existence.
To help ease the intimidation factor and introduce you properly to the thrust, we’ve called on two of our favorite experts — Hannah Eden, founder and owner of PumpFit Club and creator of the Hannah Eden Fitness app, and Rachel Hall, Fitness Director of Body FX and a certified Pilates mat and reformer trainer. Here, they walk you through all the ups (and downs) of this fantastic — and dare we say fun, once you get the hang of it — glute-sculpting move.
First, let’s talk about the muscles involved.
Section divider
Anatomy of a Hip Thrust
What major muscles are involved in the barbell hip thrust? Here’s the nitty gritty breakdown:
Gluteus Maximus: This thick, fan-shaped muscle is the technical term for the muscles that run over your buttocks area and allows for four main actions at the hip joint — extension, external rotation, and adduction and abduction of the upper leg. (It also works to keep your torso upright when standing). The glutes operate synergistically with your hamstrings, activating during the thrust to lift your hips and the barbell up and away from the floor.
Hamstrings: This three-headed muscle on the back of the leg (the biceps femoris, semitendinosus and semimembranosus) is an “antagonist” to the quads and flexes your knee joints.
Hip Adductors: The “hip adductors” are made up of five distinct muscles — the adductor longus, adductor brevis, adductor magnus, pectineus and gracilis. These muscles bring your legs toward the center of your body and serve as the antagonists to your gluteus.
Quadriceps: This muscle group on the front of your thighs is made up of four heads (the vastus lateralis, vastus medialis, vastus intermedius and rectus femoris) which work together to extend your knee joints and flex your hips.
Erector Spinae: This pair of lower back muscles run up your back on either side of your spine, helping stabilize it by flexing isometrically in concert with your abdominals to help stabilize your upper body on the bench.
Abdominals: The entire abdominal area, from the rectus abdominis (the “six-pack” muscle) up and down the front of your midsection to the internal and external obliques along the sides to the deeper transverse abdominis, are critical to maximize your body stability during this lift.

Section divider
5 Steps to the Perfect Hip Thrust
From how to position your body on the bench, to getting the barbell in place, and through the full hip lift and descent, here’s what you need to know to tackle the thrust.
1. The Set-Up
Before you take your position to begin the hip thrust, you’ll need to do some easy but important prep. “First, find a flat bench,” Eden says. “I prefer one that isn’t excessively tall. Remember, the higher the bench, the deeper your range of motion, and thus the more chance you have for error.”
You’ll also want to set up a barbell ahead of time. You’ll need to adjust to your own strength levels, but if you’re just learning the move, the best bet is an empty Olympic barbell. As you get stronger, you can work your way up to 10s on each side, then 25s, then 35s, and eventually 45s, which allow for easy ingress and egress into and out of the lifting position, as we’ll explain in a moment.
You’ll want padding next to you as well if you decide to use some in between your hips and the bar. “Padding isn’t required for the barbell, but it will make this exercise a lot more comfortable, especially if you’re using heavy weight,” Hall says. (See “Quickfire Q&A” below for more on this point.)
2. Getting Hip
Sit down on the floor with your back to the side edge of the bench, with your body directly in the center of the bench and roll or place the barbell directly over your hips, at the crease along the top edge of your quadriceps. (You’ll be able to roll the bar over your legs and to your hips if you have a 45-pound plate on each side.)
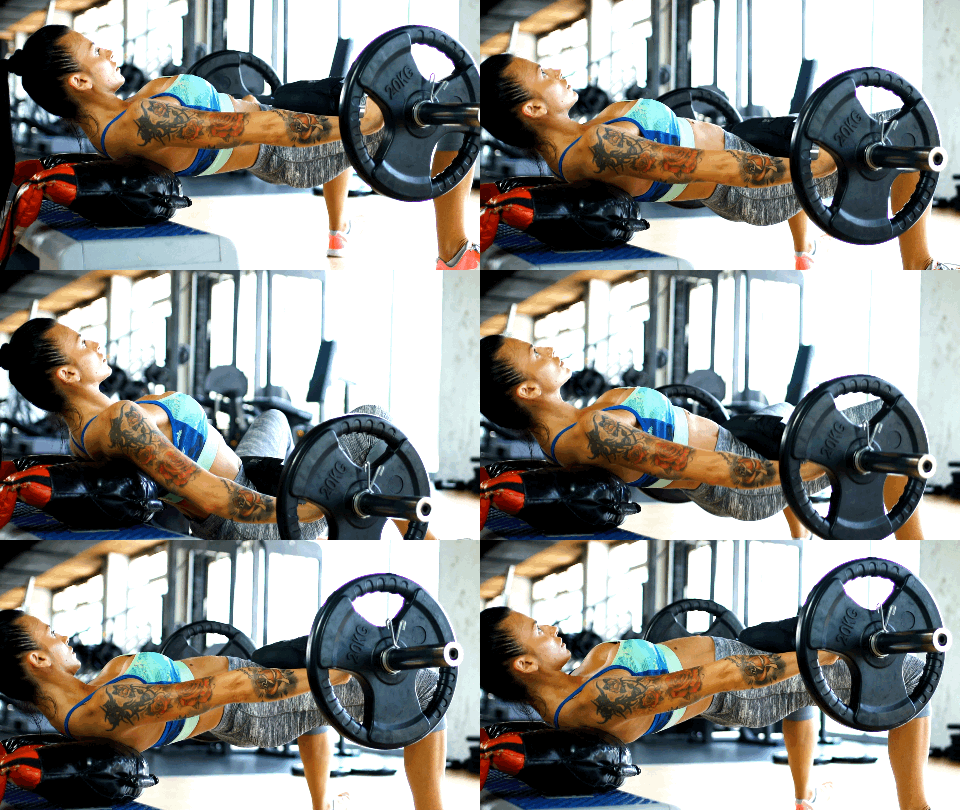
Next, carefully lean back against the bench, placing your shoulders, upper back and elbows on the bench — your elbows should be out away from your body and not tucked in. “At the same time, brace your core, engage your glutes, and lift your hips so that you naturally bring the barbell up with you,” Hall instructs. “At this point, your feet are on the floor, your shoulders are on the bench, your knees are bent at 90-degree angles, and your body should form a straight line from your shoulders to your knees. This is the starting position.”
“You want to begin your hip thrust with the barbell touching your hip flexors and sitting right above your pelvic bone,” Eden adds. “This way, when you perform your hip thrust, the barbell won’t dig into bone and cause discomfort and distraction.”
On Cue: “Think hands on bar,” Eden says. ““Place your hands on top of the barbell right outside your hips to secure it in place, since the barbell should not move or shift as you lift it up and down.”
Error Alert: “Success starts with foot placement,” Hall says. “If your goal is to focus on the glutes, then your feet need to be in the right place — with 90-degree angle in the knees, and feet hip-width apart. Before beginning the movement, look in the mirror or have a spotter confirm that your shins are completely vertical.”
Pro Tip: “Before you start your first rep, prepare your body,” Eden suggests. “Inflate your chest, create tension throughout your entire body, secure your feet to the ground and get ready to thrust your hips up by driving through your heels.”
3. Low and Slow
“Breathe in as you slowly lower your butt towards the floor,” Hall instructs. Your upper back should remain in full contact with the bench for support, with your feet planted and all the action taking place at the hips as the rest of your body remains in support and stabilization mode. “Make sure you stop just before the weight plates or your rear end touches down to the floor, so you’re not resting,” Hall adds — this helps keeps maximum tension on the glutes and other ancillary muscles throughout the set.
On Cue: “It may seem correct to look up at the ceiling, but I tell clients ‘eyes forward’ during the movement,” Eden says. “This helps to achieve maximum glute activation and prevents hyperextension of the spine. Try and find a spot higher on the wall to gaze at, while keeping your head and chest still as your hips and torso thrust up and lower down.”
Error Alert: “Many people tend to arch the lower back during the lowering phase of the exercise,” Hall points out. “Instead, maintain a neutral spine and pelvis as you lower your hips. Arching as you lower the weight strains the lower back, and this can lead to pain and injury.”
4. Driving Force
To initiate the movement from the bottom position, drive through your glutes and heels to bring your hips upward as your upper back pivots onto the bench. Stop when your torso is parallel to the floor and you’re in a bridge position, tabletop flat from your shoulders to your kneecaps, head in contact with the top of the bench. “Try your best to keep a straight and rigid torso throughout the ascent and not just correct yourself at the top,” Eden says.
On Cue: “Think about flexing your glutes and engaging your hips to thrust the barbell up as you also breathe out,” Hall says. “Squeeze the muscles for a count at the top before slowly lowering yourself back down.”
Error Alert: It helps to have a trusted partner watching you — and they should alert you if they notice you over-arching your spine at the top. “If you end up with your eyes on the wall behind you with your chest elevated and ribs sticking out, you’ve probably gone too high with your hips,” Eden warns. “This is not good; it suggests that you’re likely hyperextending the spine at the end of your rep. It tends to happen as a result of trying to lift too heavy of a weight and overcompensating.”
5. Set Points
Continue the pattern of lifting the bar with your hips and lowering it under control. As you focus on your glutes contracting and extending, also establish a breathing pattern. “I suggest an aggressive exhale on the effort — the way up — and inhale on the reset, i.e., the way down,” Eden says. “As you do so, keep a braced and tight core throughout.”
Once you complete your sets, lower the barbell all the way to the floor, and then (if you’re using 45-pound plates)
roll it forward past your feet to stand up. (A spotter can help with this as well, of course, or lift a barbell off of you that’s loaded with smaller plates.)
Error Alert: “Beware of ‘loose reps,’” Eden says. “If you find yourself struggling to maintain a tight and proper form, it may come back to improving your overall approach during each rep. You can set yourself up for success and reduce risk of injury by inflating your chest, flexing your core and creating tension throughout your entire body. In other words, get yourself ready to lift, and perform the rep with intent — don’t just go through the motions.”
Section divider
3 Moves for a Better Hip Thrust
These three variations can help improve your strength, stamina and performance in your quest to master the barbell hip thrust:
1. Banded Hip Thrust
For the banded hip thrust, you do reps against a band that’s wrapped around your hips and anchored. That could mean you have each end of the band looped over the front of your feet so they rest under your arches, or looped onto the bottom of each side of a power rack with the bench placed in the center, or even looped around two heavy dumbbells placed on each side of your body.
“This is a great alternative for both beginners and advanced lifters,” Hall explains. “For beginners, it allows them to learn the movement pattern of the exercise without having to worry about a heavy barbell. For advanced lifters, it provides a new challenge because banded exercises are based on the principles of variable resistance.”
2. Single-Leg Hip Thrust
The single-leg thrust is best done with only bodyweight or with a weighted vest. You’ll lift one leg up a few inches off the floor throughout as you perform reps with the planted leg. “This is for more advanced lifters who want to add a new challenge to their hip thrust workout while also incorporating more of a balance, stability, and coordination element,” Hall says.
3. Reverse (Feet-Elevated) Hip Thrust
“Imagine doing the hip thrust but reversed — your feet are on the bench and your upper body stays on the floor,” Hall says. “This one is excellent for focusing on slow repetitions and getting those glutes to fire like crazy.”
Section divider
Quickfire Q&A
Trainer Rachel Hall answers four of your most common questions on the thrust.
What is the most important benefit of the hip thrust exercise?
“Glute development and improving overall posture. Glute development helps strengthen the entire lumbo-pelvic hip complex, better known as the core, and helps alleviate strain in the lower back.”
Is the hip thrust better suited to heavier weights and lower reps or lighter weights and higher reps?
“Both. On strength building days, I’d recommend using more weight with fewer reps but more sets. On endurance and muscle building days, I’d recommend less weight with more reps and moderate sets. On active recovery days, I’d throw in a few sets of bodyweight-only hip thrusts.”
Are hip thrusts okay for those with lower-back issues? Why or why not?
“It depends on the source of the lower back pain. If the lower back pain is the result of muscle overcompensation from the quadriceps or hamstrings, weak core muscles, or postural imbalances, then hip thrusts could be a good thing, as they can help correct the imbalance. However, if the back pain comes from a chronic injury such as a disc issue, then you should seek clearance from a doctor or physical therapist before doing this movement.”
I hate the feeling of the bar pinching at my hips — is it better to use a towel to help alleviate the problem, or should I switch to another implement (dumbbell, sandbag, etc.)?
“Towels and small pillows work to alleviate discomfort, but I’d highly recommend making the investment into a hip thrust barbell pad. I’d only recommend another weighted implement if you don’t have access to a barbell — the potential issue with using another piece of equipment is that, depending on what it is, the distribution of weight on the hips may change. What’s more, you might not be able to lift as heavy you’d like.” (As an example, Rogue Fitness offers this pad.)
Published at Wed, 02 Mar 2022 09:05:38 -0800


